Posted on 08 November 2011 by Cathy
This is an unusual combination that is out of this world!


1 1/2 cups water
4 cups pears
4 cups apples
1/4 tsp baking soda
4 cups sugar
3 tablespoons crystallized ginger

Pick out some apples you will need 3 or 4 depending on the size

You need 3-4 pears

Peel, core and chop the apples

Peel, core and chop the pears

Place the fruit into a large saucepan along with the ginger and add the sugar

Add the baking soda

Add the water and place over high heat

Stir frequently

After the sugar dissolves the fruit will start to soften

When it comes to a boil mash the fruit into smaller pieces

Boil until a gel forms. See strawberry jam recipe to understand the jellying point

You can cook it a little longer to make the fruit a little darker if you like

It is a good idea to use a thermometer to make sure it is 220 at sea level. For each 1000 feet of altitude above sea level you will need to subtract 2 degrees.

Ladle into sterilized jars to within 1/8 inch of the top and process in a water bath for canning. You can also use it now for a cake filling…yay

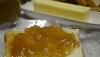
I really like the consistency of this jam!

This is my serving suggestion when not using it between cake layers

This has really a nice flavor! Hope you enjoy!

Posted on 01 November 2011 by Cathy
My great-grandmother Bessie used to say whenever we were going to make jam that we needed to remember that cup for cup was the recipe for any jam.

5 cups strawberries
5 cups sugar
Lemon juice (optional)

Pick through the berries and discard any bad berries

Wash and drain

Do you know what this is for?

Did you guess strawberry huller? Use a knife if you don’t have this gadget

Chop up the berries

Add sugar to the strawberries in a heavy saucepan. If the berries are very ripe also add 5 tablespoons lemon juice

Cook and stir constantly until the sugar dissolves.

Bring to a rapid boil. Skim off the foam that forms off the top and discard

Cook until the jellying point by testing on a spoon or until you reach 220. I like to use the spoon test even when I use a candy thermometer

When you have reached the jellying point the syrup will run off in two drops and sheet

You need to use a metal spoon for the test like I used above. I am using a white spoon to make it easy for you to see double dripping and sheeting

Ladle into sterilized jars to within 1/8″ and process in boiling water bath 5 minutes if canning

This is yummy! I use this recipe for my strawberry cake filling. Making the filling myself rather than buying from the store makes the cake more special

This is my favorite jam for toast. Hungry yet? I am!
Posted on 30 October 2011 by Cathy
This is the icing that was used on my lemon cake recipe I posted not long ago.

4 cups confectioners sugar
1 cup butter (softened)
2 tablespoons fresh lemon juice
1 teaspoon grated lemon zest
1 tsp lemon extract

Zest the lemon then juice it

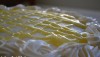
Put the ingredients into a bowl and mix just until just blended at a low speed. The more you whip the more air bubbles you will incorporate. See the air bubbles in this picture? They all need to be popped in order to make a satin type finish on a cake. Some people like the light and airy look though. If you do like air bubbles then crank up your mixer and let it go for a few minutes.

Here it is on a cake. This icing is a thin consistency which can be difficult to work with but is yummy as it is. To make it thicker you just need to add more confectioners sugar.
Go check out the lemon cake recipe here
http://www.hauntedchef.com/2011/10/26/lemon-cake/
Posted on 25 October 2011 by Cathy
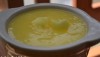
I love lemon curd! You can use it on bread or scones in place of jam, filling for cakes and for lemon meringue pie. I needed this particular batch for Taylor’s birthday cake.

1 1/4 cup white sugar
4 eggs
1 cup fresh lemon juice
3 Tablespoons lemon zest
1/2 cup unsalted butter

You need about 6 lemons

Zest the lemons. You only want the bright yellow part of the rind. That is where all the good flavor is.

Cut them in half
Juice the lemons with a reamer or juicer. You will need 1 cup of juice

In a microwave-safe bowl, whisk together the sugar, lemon juice, lemon zest and butter. Microwave 2 minutes.

Temper the eggs by pouring some of the lemon mixture into the eggs and mix (to bring the eggs to the cooked temp) then pour back into original mixture

Microwave at one minute intervals and stir after each minute

Keep running microwave for 1 minute at a time and stirring until it thickens

The mixture is done when it is thick enough to coat the back of a metal spoon

Remove from the microwave and pass the mixture through a fine sieve to remove the little bits of cooked egg that may be in the mixture

Pour into small sterile jars and store in the refrigerator for a week

You can use it between cake layers for a yummy filling